Initializing the library
As usual, the library needs to be in the library folder on the Arduino.
Once the signal has been decoded with SequenceDecoder, getting the library to work is easy. The only complicated part is initializing the library do match a specific controller. DO NOT GET SCARED WITH IT, that code is generated automatically by SequenceDecoder. :P Here is the code for a Samsung remote controller as an example:
unsigned long mark_duration_329[4] = {607, 1578, 4494, 46556};
int message_code_start_329[2] = {3, -3};
int message_code_one_329[2] = {1, -2};
int message_code_zero_329[2] = {1, -1};
int message_code_end_329[2] = {1, -4};
WirelessController my_device = WirelessController(mark_duration_329, message_code_start_329,
message_code_one_329, message_code_zero_329, message_code_end_329,
4, 2, 2, 2, 30, ENCODING_PULSE_WIDTH, INPUT_ACTIVE_LOW, 32 );
byte my_device_new_button[4] = { 224, 224, 22, 233 };
The next paragraphs describe what these lines in the initialization do. If you just want to send/receive commands but don't care how it works, you can skip to the next section: Sending and receiving commands.
First of all, the 329 number that appears in all of the variables. That is just a random number, created so that is we want to program different devices on the same Arduino, there will be no conflict with the variable names.
The first line contains a list of the different mark durations that exist in this code. All of these marks will then be combined in specific order to send/receive the messages
These four lines identify which marks are used in specific parts of the message. A positive or negative value is used depending on if the mark has a High or Low value.
For instance, the code_start, which is {3, -3} means that every message starts with a 4494 microsecs High pulse (3), and then a 4494 microsecs Low Pulse. The code_one, which is {1, -2}, means that to send a bit with the value one, we send a 607 microsecs High pulse (1), then a 1578 microsecs Low pulse (-2).
4, 2, 2, 2, 30, ENCODING_PULSE_WIDTH, INPUT_ACTIVE_LOW, 32 );
This line creates the actual object for the controller. It receives all of the previous lists as parameters, along with their dimensions. The four last parameters are the tolerance (the same tolerance used in SequencDecoder), the type of encoding used, if the sensor used has an active high or low output, and the number of bits on each message.
Once the signal has been decoded with SequenceDecoder, getting the library to work is easy. The only complicated part is initializing the library do match a specific controller. DO NOT GET SCARED WITH IT, that code is generated automatically by SequenceDecoder. :P Here is the code for a Samsung remote controller as an example:
unsigned long mark_duration_329[4] = {607, 1578, 4494, 46556};
int message_code_start_329[2] = {3, -3};
int message_code_one_329[2] = {1, -2};
int message_code_zero_329[2] = {1, -1};
int message_code_end_329[2] = {1, -4};
WirelessController my_device = WirelessController(mark_duration_329, message_code_start_329,
message_code_one_329, message_code_zero_329, message_code_end_329,
4, 2, 2, 2, 30, ENCODING_PULSE_WIDTH, INPUT_ACTIVE_LOW, 32 );
byte my_device_new_button[4] = { 224, 224, 22, 233 };
The next paragraphs describe what these lines in the initialization do. If you just want to send/receive commands but don't care how it works, you can skip to the next section: Sending and receiving commands.
First of all, the 329 number that appears in all of the variables. That is just a random number, created so that is we want to program different devices on the same Arduino, there will be no conflict with the variable names.
- unsigned long mark_duration_329[4] = {607, 1578, 4494, 46556};
The first line contains a list of the different mark durations that exist in this code. All of these marks will then be combined in specific order to send/receive the messages
- int message_code_start_329[2] = {3, -3};
- int message_code_one_329[2] = {1, -2};
- int message_code_zero_329[2] = {1, -1};
- int message_code_end_329[2] = {1, -4};
These four lines identify which marks are used in specific parts of the message. A positive or negative value is used depending on if the mark has a High or Low value.
For instance, the code_start, which is {3, -3} means that every message starts with a 4494 microsecs High pulse (3), and then a 4494 microsecs Low Pulse. The code_one, which is {1, -2}, means that to send a bit with the value one, we send a 607 microsecs High pulse (1), then a 1578 microsecs Low pulse (-2).
- WirelessController my_device = WirelessController(mark_duration_329, message_code_start_329,
4, 2, 2, 2, 30, ENCODING_PULSE_WIDTH, INPUT_ACTIVE_LOW, 32 );
This line creates the actual object for the controller. It receives all of the previous lists as parameters, along with their dimensions. The four last parameters are the tolerance (the same tolerance used in SequencDecoder), the type of encoding used, if the sensor used has an active high or low output, and the number of bits on each message.
Sending and receiving commands
When either sending or receiving specific commands, it's handy to define all the commands we want to use in the beginning, in variables such as the following one:
If we want to use the library to receive commands, we need to initialize it using
To actually make the Arduino read and process commands use a piece of code like this:
if (my_device.codeReceived() )
{
if (my_device.compareCode(my_device_test_button) )
{
// Do whatever you want to do when the test button is pressed here
}
}
This block of code needs to be called often otherwise the timings might be off and the commands may be missed.
In a similar way, to send commands, first of all we need to call
Radio controllers use much higher frequencies that cannot be modulated by an Arduino, so the modulation is always done by the emitter. In this case, set the parameter to false;
To send the command, use the function
- byte my_device_new_button[4] = { 224, 224, 22, 233 };
If we want to use the library to receive commands, we need to initialize it using
- my_device.intializeReading(PIN_DATA_IN);
To actually make the Arduino read and process commands use a piece of code like this:
if (my_device.codeReceived() )
{
if (my_device.compareCode(my_device_test_button) )
{
// Do whatever you want to do when the test button is pressed here
}
}
This block of code needs to be called often otherwise the timings might be off and the commands may be missed.
In a similar way, to send commands, first of all we need to call
- my_device.intializeWritting(PIN_DATA_OUT, true);
Radio controllers use much higher frequencies that cannot be modulated by an Arduino, so the modulation is always done by the emitter. In this case, set the parameter to false;
To send the command, use the function
- my_device.sendCommand( sony_tv_volume_up );
Receiving commands demo
The following program uses two buttons on a Samsung TV remote controller to turn a LED on and off.
#include "WirelessController.h"
#include "DigitalWriteFast.h"
#define PIN_DATA_IN 4
#define LED_PIN 8
unsigned long mark_duration_345[4] = {562, 1615, 4490, 46596};
int message_code_start_345[2] = {3, -3};
int message_code_one_345[2] = {1, -2};
int message_code_zero_345[2] = {1, -1};
int message_code_end_345[2] = {1, -4};
WirelessController samsung = WirelessController(mark_duration_345, message_code_start_345,
message_code_one_345, message_code_zero_345, message_code_end_345,
4, 2, 2, 2, 65, ENCODING_PULSE_WIDTH, 32);
byte samsung_volume_up[4] = { 224, 224, 224, 31 };
byte samsung_volume_down[4] = { 224, 224, 208, 47 };
void setup()
{
pinModeFast(LED_PIN, OUTPUT);
samsung.intializeReading(PIN_DATA_IN);
}
void loop()
{
// Checks if a new message has been received
if (samsung.codeReceived())
{
// Pressing the volume up button turns the LED on
if (samsung.compareCode(samsung_volume_up))
{
digitalWriteFast(LED_PIN, HIGH);
}
// Pressing the volume dows button turns the LED off
if (samsung.compareCode(samsung_volume_down))
{
digitalWriteFast(LED_PIN, LOW);
}
}
}
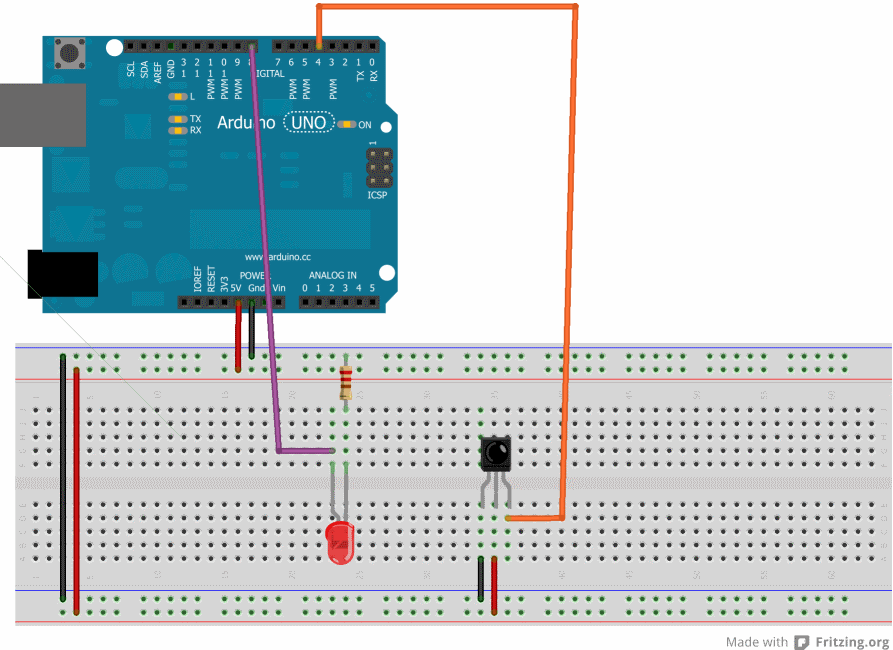
Suggested circuit for this code. Really simple, just connect the infrared receiver to pin 4 and the LED to pin 8.
Sending commands demo
The following program sends a command for a Samgung TV to set the volume up at when you press a button.
#include "WirelessController.h"
#include "DigitalWriteFast.h"
#define PIN_DATA_OUT 2
#define PIN_BUTTON 7
unsigned long mark_duration_345[4] = {562, 1615, 4490, 46596};
int message_code_start_345[2] = {3, -3};
int message_code_one_345[2] = {1, -2};
int message_code_zero_345[2] = {1, -1};
int message_code_end_345[2] = {1, -4};
WirelessController samsung = WirelessController(mark_duration_345, message_code_start_345,
message_code_one_345, message_code_zero_345, message_code_end_345,
4, 2, 2, 2, 65, ENCODING_PULSE_WIDTH, 32);
byte samsung_volume_up[4] = { 224, 224, 224, 31 };
void setup()
{
pinModeFast(PIN_BUTTON, INPUT);
// Initializes the controller to send data and modulate the ourput
samsung.intializeWritting(PIN_DATA_OUT, true);
}
void loop()
{
// Checks if the button is being pressed
if (digitalReadFast(PIN_BUTTON))
{
// If the button is being pressed, sends the command
samsung.sendCode(samsung_volume_up);
}
}
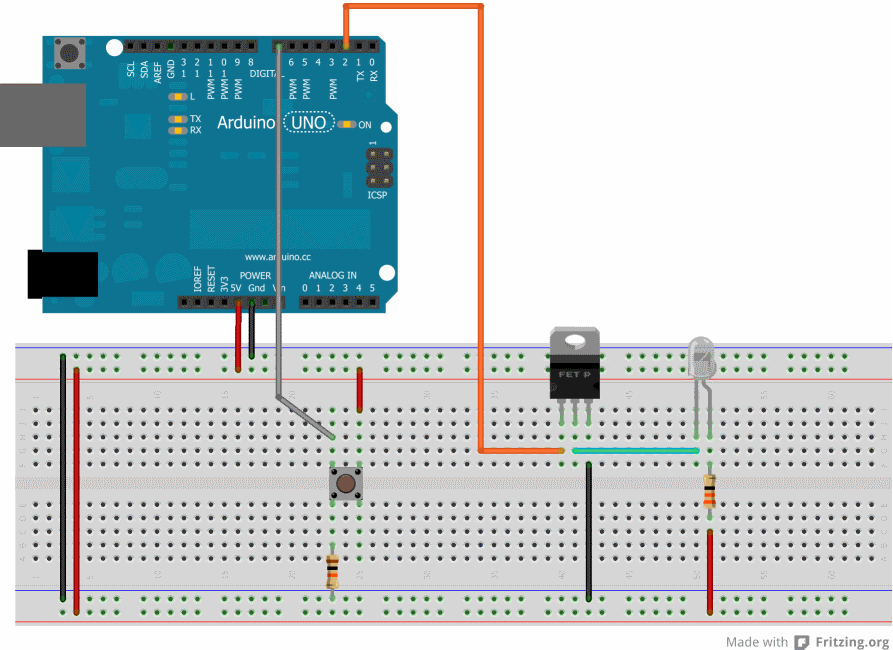
This is a suggestion on how to connect the components to the Arduino. The button is a simple push button with a 10K pull-down resistor.
Then there is an infrared LED activated through a FET transistor and a 33ohm resistor. If you don't know what a FET is, in this case it's acting like a digital switch. Instead of the Arduino supplying power directly to the LED,
It is used so we can have a more powerful LED to send the signal.
For an initial resting you can just connect the output pin to the LED through a 100ohm resistor, but it won't be very bright, meaning it needs to be much closer to the receiver to be noticed.
Forward commands demo
This program retransmits any incoming commands that are received. It is useful for example if we have a media center sending images to different televisions and some are far away. Having the infrared receiver close to a television and the infrared LED close to the media center will allow us to control it from far away.
#include "WirelessController.h"
#include "DigitalWriteFast.h"
#define PIN_DATA_OUT 2
#define PIN_DATA_IN 4
unsigned long mark_duration_827[3] = {881, 1763, 90364};
int message_code_start_827[0] = {};
int message_code_one_827[2] = {-1, 1};
int message_code_zero_827[2] = {1, -1};
int message_code_end_827[1] = {-3};
WirelessController zonbox = WirelessController(mark_duration_827, message_code_start_827,
message_code_one_827, message_code_zero_827, message_code_end_827,
3, 0, 2, 1, 30, ENCODING_MANCHESTER, 14 );
byte message_buffer[2];
void setup()
{
// Starts up the controller for both sending and receiving commands
zonbox.intializeReading(PIN_DATA_IN);
zonbox.intializeWritting(PIN_DATA_OUT, true);
}
void loop()
{
// Checks if a new message has been received
if (zonbox.codeReceived())
{
// When a new message is received, sends it again
zonbox.getCode(message_buffer);
zonbox.sendCode(message_buffer);
}
}
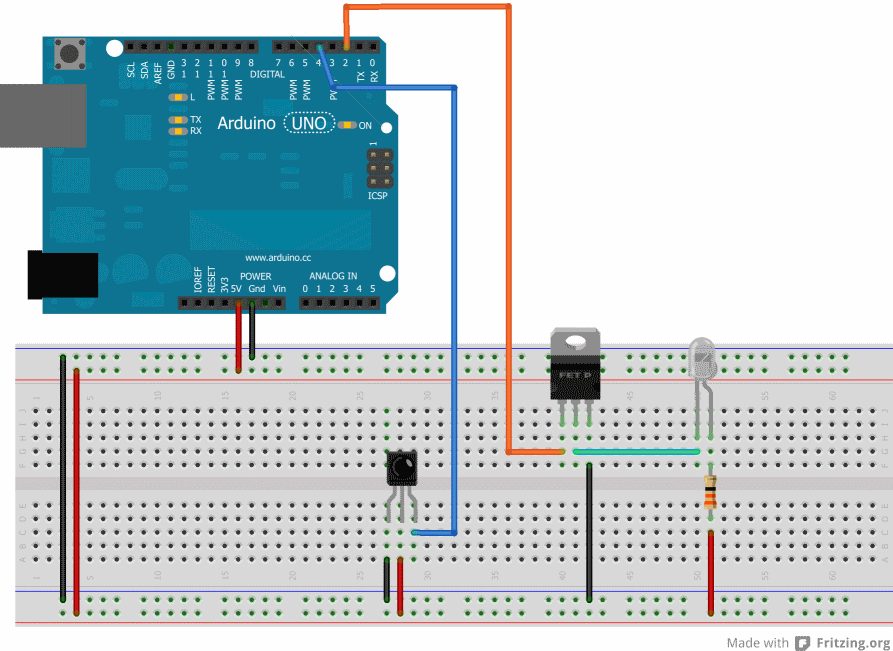
The schematic for this demo is just a combination of the two previous ones, nothing else is new.
